Welcome to my blog

If you enjoy finding a lot of different outlets for your creativity, then we may just be kindred spirits.
This blog is an outlet for my interest in miniatures, crochet, plastic canvas, and many other various arts and crafts.

I also love walking, taking digital photos, and most recently, have rediscovered an old love...bike riding! I purchased an amazing new bike, a comfy Townie by Electra this summer, and have been having a grand time exploring the area as though for the first time. It's like being a kid again!

If you enjoy any of these things too, pour a cup of coffee and tea, sit down, and join me.


Take care!
Kat
Showing posts with label 24th scale. Show all posts

Friday, June 3, 2016

Completed Miniature Pet Shop Kit in 1:24 scale

I finished my little Pet Shop Kit; woohoo!
Pet World DIY miniature kit in 1:24 scale, completed
 My Dad had to do the wiring for me, and it looks so great all lit up at night!


 I am really pleased with the way it came out,! 
Sadie had to duck down to take a look.  She says she'd like a 1 inch scale pet shop so she can go shopping for Rufus.  I told her I'd think about it ;-).

In the meantime, I ordered another DIY storefront shop kit from China; called Green's Bar.
This is what it will look like:
Sorry for the grainy image, but it's going to be so cute! It has already been shipped but it's coming from China so will probably take a month to get here.


Saturday, May 21, 2016

Mini Cat Climbing Tree with Scratch Post and Bowl

I made this cute little cat tree, from my Pet Shop kit from China.
Miniature cat tree with scratching post and toy, 1:24 scale
Isn't it cute?  All of the wood pieces, the legs, bead, and green felt were provided in the kit, along with instructions.

Instructions for mini cat tree
 I don't know if you can tell, but the wood pieces for this item are nice and sturdy; great quality.
Wood parts for mini cat tree
 I glued the pieces together with Alene's Tacky Glue, Quick Grab.
Assembling mini cat tree
The scratch posts are tiny lengths of toothpick or skewer-type wood, wrapped with unraveled rafia type paper.
Making the scratch posts
 The base was just a piece of felt but I found it wasn't sturdy enough that way so I added a piece of cereal box cardboard onto the back.
The base

 After the parts have been glued and allowed to dry, they were glued together.
Pieces of mini cat tree ready for assembly
 I also made a simple pet dish, using a length of corrugated cardboard glued around a cut out circle of cardboard.  The instructions said to use a circle of paper but I wanted it sturdier.
Simple cardboard pet dish
 The cat toy is just a bead glued to a bit of the rafia paper, which I rolled in my fingers to make thinner.
Finished cat tree
Here it is; the glue is still wet in this picture.  I think a mini cat would like this, don't you?

Friday, May 20, 2016

Mini Hassock for Pet Shop DIY kit

I've been going through mini making withdrawal so I decided I'd better continue on with my mini DIY Pet Shop kit from China.  I'm already on Bag number 3; the last bag (see contents below).

Bag 3 of Pet Shop DIY kit
 Here's a close up of the contents:  various bits of fabric, thread, wood pieces, lights, wiring, beads, ribbon, and round metal things (can't think what they're called).  Also cut wood pieces to make a cat scratching post stand, and two round wooden pieces to make what they call a sofa but what we would call a hassock or ottoman.
Bag 3 contents
 The instructions say to start with the "sofa" (aka hassock or foot stool) so that is what I did.  I pulled out the two round wood pieces, some corrugated cardboard from Bag 2, the piece of red felt, and the 3 black beads and put them aside.
Instructions
 Next I measured the corrugated cardboard and cut it according to directions.


 Then I rolled the cardboard around  the edge of one round piece of wood, and glued it in place.  I left some room for the cardboard to overlap a bit, glued it, and put a clip on it until it dried.
 The next step said to glue the second round wood piece on top, so I did that.  It's starting to take shape and looks very cute.
 Then I cut out a paper circle to match the wood circle, traced it onto the red felt, and cut that out.  I also cut a long strip of red felt to glue along the side of the hassock.
 After the felt was glued in place firmly, I tipped the hassock over and added black beads for the feet.
Adding bead feet to the hassock
 And here it is; a simple but cute hassock.
Completed mini hassock

Saturday, May 14, 2016

Mini Pet Shop contents: pillows, collars, books, dog bed

I've been busy making these teeny tiny items for my pet shop.
Mini DIY pet shop kit items

The tiny collars are so cute.  They're just strips of felt with little buttons glued on, and the silver part is a silver twist tie (like for tying up garbage bags).  The books have pages, but they're blank, lol. So tiny!  I wanted to get a photo with a coin to show size but the battery on my camera died so it's recharging now.

The white pillow is just three layers of felt, cut in bone shapes and glued together.  The blue pillow is an actual pillow that I sewed and stuffed, with a felt dog paw applique glued on.  The dog bed is ingenious; it's just a printable rectangular box, with strips of rafia paper glued on in the round, so it looks like a basket.  Then a bit of cloth was glued inside.  The dog came with the kit.

DIY mini pet shop kit
So this is what I have done so far.  I have to glue the shelves into the store, and then I can start gluing the items down.  I still have some of bag B to finish, and then I can start on bag C, the final bag.  Then I'll get my Dad to do the wiring for the lighting, lol, and it will be done!  It will still take quite awhile as the tiny items that go inside are very fiddly and time consuming.  I'm enjoying making the items a lot more than I enjoyed making the shop itself.


Monday, May 9, 2016

Min Pet Shop KIt Outside Portion Finished

It took forever to do the outside portion but I'm finally done.
Mini Pet Shop DIY Kit outside
I'm pretty pleased with the way it turned out; it is very cute and sweet.  The hardest part was putting the darn hinges on.  I put them on twice, in the wrong place the first time, and backward the second, and finally had to get my Dad to fix it.  He did, and the front swings open great now.

The front portion consisted of assembling the door pieces and gluing them together, the window pieces, the decorative paws, The awning, hanging sign, including the thing it hangs from, the door knob, the sidewalk, and the cute little welcome sign.  The only difficult part was getting the glue to stick.  I ended up having to use a glue gun to glue the wire hanger for the sign together, then onto the house, and also for the beads that make up the doorknob and to attach the sidewalk strip to the main front piece.  I used the glue that came with the kit for everything else.

 I bought the little pink clips in the above photo at the dollar store and they came in handy, but I need to find some longer ones.  They worked to hold the tall orange sign and the bone sign in place while they dried.  They really helped for the bone, because that was a bit warped and didn't want to lay flat.
In the above photo, you can see how the entire front swings open.

 I decided to start on Step 3, which is the assembly of the contents of package B.  The first two instructions said to make the shelves, which I did.  The glue that came with the kit did not work for these shelves; they kept falling apart. In the end, I used Alene's Quick Grab Tacky glue, and it worked much better.  I didn't line up all of the long pieces on the orange shelf properly because every time I touched it they shifted out of place and after redoing it 5 or more times, I gave up and decided they didn't have to be perfect. 
The kit is very cute but it is very tedious and there is no sense of creativity like there was when I made my bake shop.  I liked the freedom of making whatever I wanted with the bake shop.   This is more like putting a puzzle together, and it's all cutting, placing, and gluing.  I still enjoy it, but I don't get that creative buzz that I like with this.

Tuesday, May 3, 2016

New Project! Mini Pet Storefront Kit

I bought this kit on ebay and it's really cute, and really small, lol. Mine is the Pet World one, circled in yellow below.  If this works out, I'd also like to get a few of the other kits; namely Green's Bar and the little restaurant. The seller shipped quickly considering it came all the way from China.  I'll add the link but I don't know for how long it will work; I guess it depends on how many more kits s/he has.  You can buy your own mini Pet World kit here.
Pet World Mini DIY kit
 The box was shipped from China and this package was inserted into a larger box with lots of protective wrapping.  This kit also had bubble wrap around the parts inside, but I took the bubble wrap out and placed it in the lid for the picture. 
Pet world mini DIY kit
 The kit is extremely good quality, the wood is so much better than my Greenwood kits which I plan to work on this summer.
Pet world mini DIY kit contents
 This kit came with the room box, the cover, a flooring, 3 bags full of little bits of wood, doodads, etc., glue, wiring, a battery holder but no battery, tons of very tiny printables, and some clear sheets for windows.
mini dog
 In the photo above you can see the little dogs. The kit was supposed to contain 2 but they sent me three. They are very cute.  I like the white one best.
 When I saw how tiny the printables were, I scanned them to my computer so I could do practice folds of the smaller pieces.  I am not used to this scale at all; I thought 1:12 scale was small but this is 1:24th scale so even smaller. 


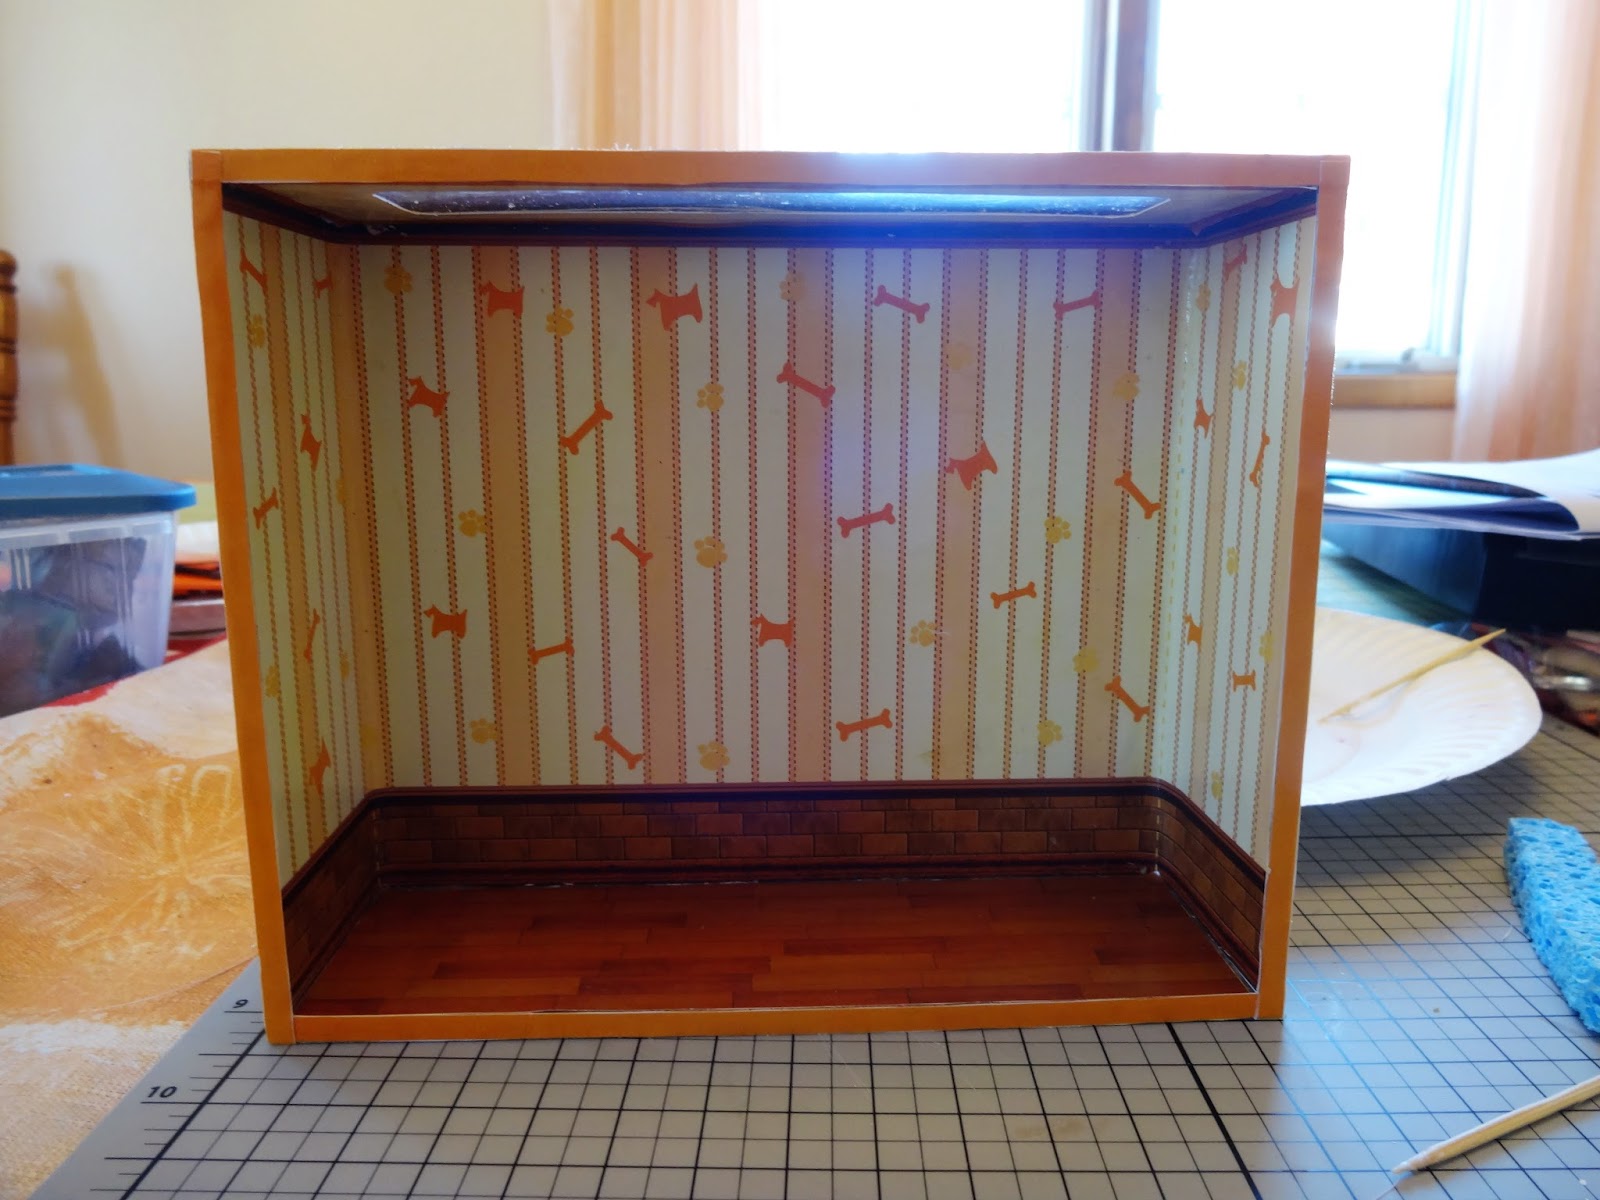
Pet World DIY kit, roombox portion
 There's the room box portion of the kit in what looks like my giant hand, lol.
Pet World Mini DIY kit step 1 complete
 In the above photo, you can see step 1 completed.  Basically I had to cut out the wallpaper, roof and floor paper, and tiny ribbons of orange side paper and glue them on.  The roof also had a strip of clear plastic that looks a lot like the old overhead screens.  The glue still wasn't dry when I took this photo; hopefully it will dry clear.  I was actually surprised to get glue at all because in the Ebay auction I was warned that they can't ship the glue and batteries.  I didn't get the batteries but the glue was a nice surprise.
Pet World Mini DIY kit English instructions
The English instructions are OK; easy to understand but the writing portion is pretty sparse.  The photo portion, however is wonderful and tells you exactly what to do, step by step.  I hate cutting things out so this section was very tedious for me, but it looks so cute I don't mind in the end.

For the next section, the Storefront, I have to attach the hinges and screws and I'm a bit worried about that.  I don't know where my tiny screw driver set is.  If I can't find it I'll have to run to the dollar store to get a new set.

So, that's it for now.  It's a very cute kit, and I got it for a great price (20 bucks).  I've seen it sell for 60 on Amazon so if you get one, shop around first.