Welcome to my blog

If you enjoy finding a lot of different outlets for your creativity, then we may just be kindred spirits.
This blog is an outlet for my interest in miniatures, crochet, plastic canvas, and many other various arts and crafts.

I also love walking, taking digital photos, and most recently, have rediscovered an old love...bike riding! I purchased an amazing new bike, a comfy Townie by Electra this summer, and have been having a grand time exploring the area as though for the first time. It's like being a kid again!

If you enjoy any of these things too, pour a cup of coffee and tea, sit down, and join me.


Take care!
Kat
Showing posts with label mini flowers. Show all posts

Sunday, May 1, 2016

Mini Window Box and Stone Rose Planters

I am finished making mini flowers; woohoo! 
Miniature window box full of flowers
I found the tutorial for the morning glories (blue hanging flowers) at About.com, here.

I made the flowers using my mini circle hole punch, and drew a five armed star shape with a white gel pen. This was similar to the Petunias, except they had 8 lines instead of 5. 

I used the heart shaped punch for the leaves.  Both the flowers and leaves were made from coffee filters that had been painted a few weeks ago, and all were shaped using a ball tipped embossing tool.  The hanging portion of the flowers are glued on to thread.  Yes, I glued flowers on to thread.  It was VERY fiddly and maddening but it was actually easier than gluing the flowers on to the wire.  I did the upright portions on wire, and bent them over. I like Alene's quick dry tacky glue for this.

The other flowers were made using my big border punch that punches out various flower shapes.  I used markers for the centers of some, and for others I painted the end of a wire yellow and pushed it right through the flower.  This worked better than gluing them to the ends of the wire; when I did that, the flowers kept straightening out on me.
Morning glories in progress

I really love the way the morning glories came out.  Blue flowers are my absolute favorite.
Mini long stem roses in stone planters
My rose planters are finished too.  I added some moss for greenery because I felt it needed something.  I love the roses but they'd be better in a vase than in the planters.  The white roses are my favorite; they were all made from coffee filters, but the white were unpainted.  I used acrylics for the red and yellow.  Next time I'm going to try water colors instead.

I enjoyed making the flowers and my Bake Shop Patio is looking so colorful.  I already glued all of these flower boxes into place, and I added some advertising and signage.  I just have to make some chair cushions and I'll be done.  I made one but it looks weird so I have to look at a few tutorials on how to do the corners.  I also suck at wrapping gifts when it comes to corners, lol. 
I added some craft sticks along the patio and roof to give it a more finished look and I'm happy with it.  I think I'm putting off doing the second chair cushion because then I'll be done, and I hate the thought of being done; I had so much fun with this project.


Thursday, April 28, 2016

Mini Delphiniums On Trellis

I am loving the way this turned out!
Mini Delphiniums on trellis
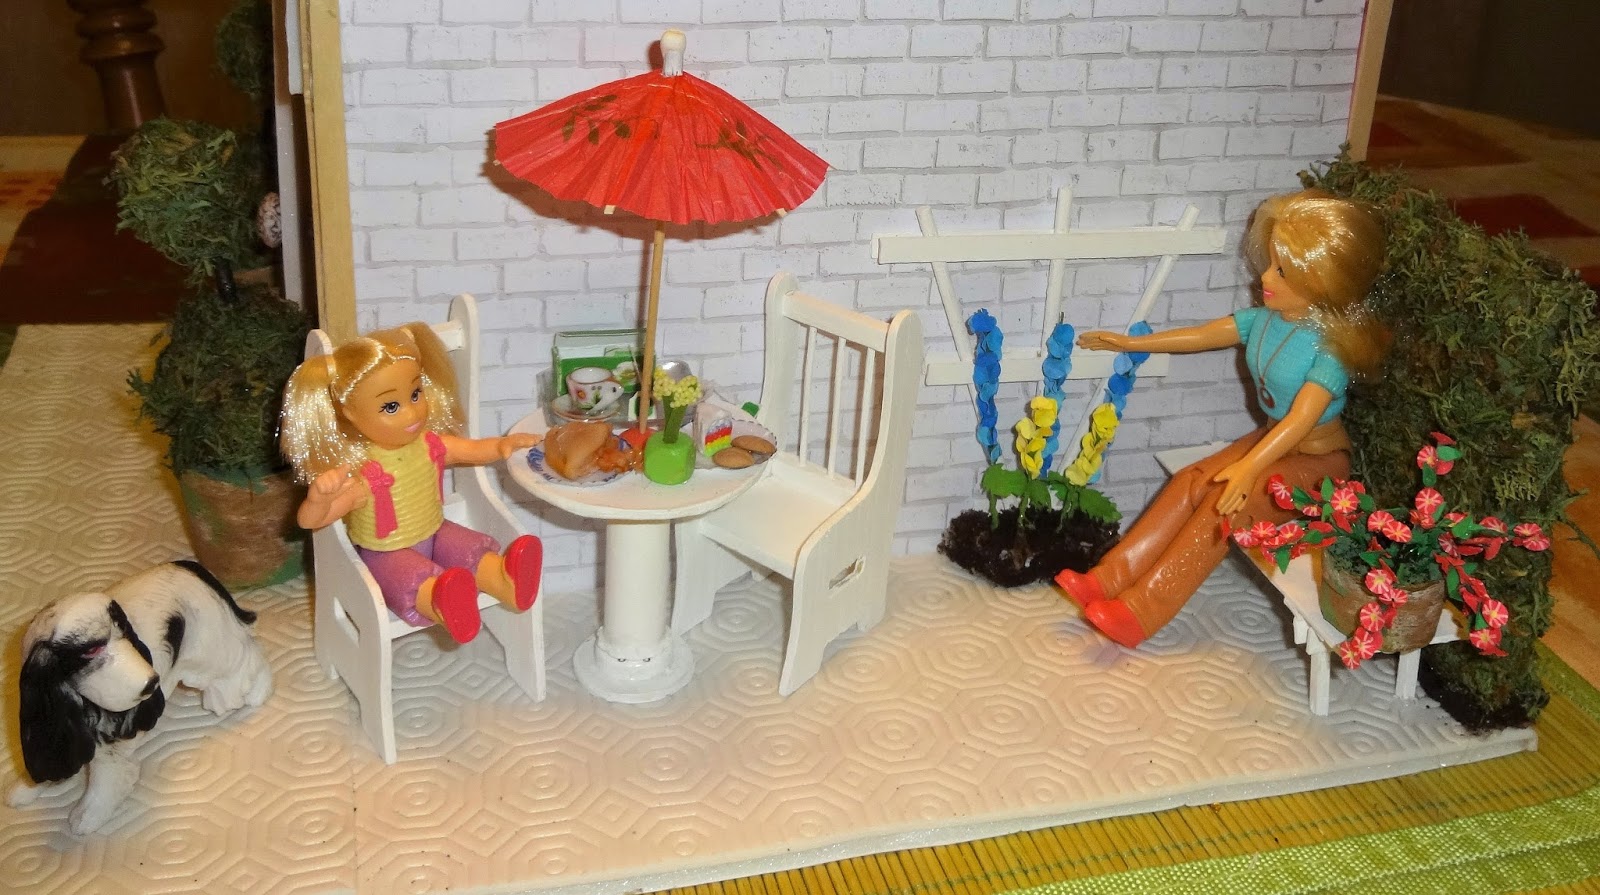
I made 9 delphinium plants but only used 5 in the end, 3 blue and 2 yellow.  I used two layers of left over foam core for the "ground", cut into that shape (see above),  and glued together.  Then I glued the trellis onto the foam core shape, and added the flowers. It was difficult because they didn't want to stick into the foam properly.  Once I had them in place, I used my glue gun to glue the in place, and put glue all over. Then I shook some of my dried coffee grounds over the still hot glue and used a toothpick and my finger to pat it into place.  After I was satisfied, I glued the trellis and plants onto the patio.
Mini delphiniums on trellis
 I may still outline the "dirt" with little rocks; I'm not sure yet. 
Foam Core miniature bake shop patio

Foam core mini bake shop patio
 Sadie and Michelle love the flowers.  Rufus would like a tree (or his fire hydrant back) to pee on, lol.
Dolls relaxing on patio
I still have to fill the two big stone planters that I made for the front of the patio, plus the window box.  I made 8 more roses today; 4 golden yellow, and 4 white, to go with the 8 red I made earlier.  I can tell I'm learning as I go as the new roses are nicer.  The leaves are nicer too.  I will take photos later.  I can't wait until my leaf paper punches come in the mail.  I ordered the maple on one Ebay today as it was the only one missing from the set I bought on Etsy.  The set on Etsy STILL hasn't been shipped. 

Wednesday, April 27, 2016

Delphiniums in Progress

I am almost finished with these Delphiniums; woohoo. They've been taking FOREVER, but I also had to take two days off from minis due to being sick.  I don't know what I have; it started with tummy upset and headache, then yesterday I woke up with laryngitis and a super sore throat and that all over achey-flu feeling.  I still feel awful today but decided to work on my minis in hopes they'd distract me.

The tutorial I used for the mini delphiniums  can be found here.
Mini Delphiniums almost finished
I had the flower parts already done, but was stuck on the leaves.  I ordered some mini leaf paper punches but they haven't been shipped yet so I made these leaves using painting tape and wire.  They came out OK but I didn't like the way the wires all looked wound up together, and the green painting tape was too bright so I painted them with my leaf green craft paint.  I like them a lot better now.  I think another layer or two of paint on the stems will help disguise the twisted wires.  If not, I can always try mixing the paint with some glue to thicken it a bit.

Anyway, a few days ago, I prepared a bunch of stems.  I dipped the tips in yellow for other flowers, and for the delphiniums I added those little tubular beads to the wire to make a thicker part.  I think the tutorial called them bugle beads.   I painted them green to match the stem, and think they'd make great cattails if painted brown instead :-).
 I painted some cone shaped coffee filters last week and used the blue and yellow ones for my delphiniums.  I used my mini circle punch and punched a tiny container full of circles.


I used my ball tool (not sure what it's really called, lol) to indent the circles, using a bit of craft foam underneath to help shape them.


Then I glued them to the bead covered portion of the stem, 3 blossoms at a time.
It was fun building them up; I made some taller than the others.


I found a tutorial online, about how to make ivy, and used it to make these leaves.  You can find the tutorial here.
I used this thin wire, and this wide green painters tape.  I put cut pieces of wire, pushed them down onto the sticky portion of the tape, folded the tape so both sides of the wire were covered in tape (see photo below), and drew leaves, then cut them out.
I did two leaves per flower.

Sadie loves her delphiniums.  I'll like them more after the stems get a few more coats of paint.

Wednesday, April 20, 2016

Big Pot of Mini Petunias for the Bake Shop Patio

I'm finished, and although they are cute, I will never make these again, lol.
Mini Petunias
 Making the petals was fine, and even gluing the petals was fine, but the leaves were hell on earth, lol.   I had to punch the hearts out...easy.  Then I had to fold them in half...not so easy but doable.  Then glue them onto the teeny tiny wire that is acting as a stem.  Mission impossible. Even with the use of my tweezers, they did not want to stay in place. I tried regular white glue, clear glue, tacky glue, fast grab tacky glue...it was all awful. 
Mini Petunias
 Despite the problems, little Michelle is thrilled with the flowers.  She even picked one for her hair :-).
Mini Petunias
The patio needed that splash of color to balance the umbrella.  I'm supposed to make climbing roses next, and a window box worth of flowers.  I don't know if I'll have the patience, lol. I'm going to have to get a leaf paper punch; the hearts really are too fiddly for me.

I liked the petunias better when they were standing straight up, as in the above photo, rather than bending them so I'll have to make some stand up flowers like hollyhocks or something.  I really prefer that look.  I think this same tutorial could be used for hollyhocks; maybe using a bigger circle hole punch instead, and different colors.