Welcome to my blog

If you enjoy finding a lot of different outlets for your creativity, then we may just be kindred spirits.
This blog is an outlet for my interest in miniatures, crochet, plastic canvas, and many other various arts and crafts.

I also love walking, taking digital photos, and most recently, have rediscovered an old love...bike riding! I purchased an amazing new bike, a comfy Townie by Electra this summer, and have been having a grand time exploring the area as though for the first time. It's like being a kid again!

If you enjoy any of these things too, pour a cup of coffee and tea, sit down, and join me.


Take care!
Kat
Showing posts with label dollhouse miniature. Show all posts

Sunday, July 3, 2016

Miniature Gift Bag Room Box

Gift Bag Room Box
 I made this gift bag room box for my Uncle Buck's 85th birthday, yesterday.  It took me over 7 hours of non stop work but I had a blast making it and only wish I would have thought of making it earlier so I would have had more time to work on it.
Room box in a gift bag
 I cut a window out of the gift bag and added some bias tape around the edges.  I wanted to use ribbon but my Mom put my box of ribbons somewhere and I can't find them.
 I made the interior walls, roof, and floor out of foam core, left over from my bake shop.  The wall paper and flooring is contact paper, from the dollar store. 
 I resized a photo of my uncle Buck and his late wife, Cobie, for the wall, and used scotch tape to attach it to a piece of wood.  The tape kind of looks like glass in real life.

Buck wanted cake, pizza, and KFC, so I recreated that in mini, using polymer clay.  I made the cake big because the real cake was huge, big enough to serve 20 people with lots of left overs.  I also put in a cheese and cracker tray with a bowl of olives, and some bead vases.  The pizza box and chicken bucket are printies.
 My uncle loves Frank Sinatra and has all of his albums so I rezised an album cover and printed it out, and glued on a backing so it's like an envelope.  I even cut out a little disc to put inside but didn't have time to paint it black.
 The furniture was from the dollar tree.  I wish I would have had time to paint it.
Uncle Buck really loved his gift, and so did everyone else.
I will definitely make another one one day.

Thursday, April 7, 2016

Mini Chocolate Chip Cookies!

I'm having such a blast making mini baked goods.  Today, chocolate chip cookies are on the menu.
Miniature polymer clay chocolate chip cookies.
These were super easy but soooo time consuming.

Mini chocolate chips for 1:12 inch scale dolls
 Sadie is very happy with these cookies; they fit perfectly in her tiny hand (with the help of some unbaked polymer clay to hold it in place, lol.
Mini chocolate chips next to real cookie
I even grabbed a real cookie to show scale.  I only had Maria cookies here.  Heaven forbid I bake real cookies for me, lol.

I followed a great tutorial on youtube to make these cookies.  It's by SugarCharmShop.  She has the BEST tutorials.  I'm just starting out so my things aren't as nice as hers, as she is a gifted artist, but I'm learning, and having a blast. 
Mini chocolate chips from baked polymer log
I baked a thin polymer log, as per the tutorial, and then chopped it up into chocolate chips and chunks.  This was hard to do as I overbaked the polymer clay.  I had to use a magnifying glass and reading glasses, lol.
Then I mixed the polymer clay with the chips.
I used Sadie's hand as a guide to get the right size cookies.
Then I rolled a log, chopped cookies off, and shaped them. Then I used a toothbrush, foil, and a pin to add texture and details.  The video in the link above explains this much better.
Lots of polymer clay cookies
I broke one cookie apart, as though someone was eating it, and I left a little roll and one slice in case I want to do a baking scene with Sadie.  I didn't paint or texture the roll and slice so they look unbaked (even though they're baked, lol).


I don't know what I like better, watching videos of mini tutorials, searching google and Pinterest for ideas, or making things.   These simple cookies took almost 3 hours, including baking time and photography.  I can make real cookies in half an hour...and now, I really want cookies . Sadie offered me hers, but it's really not the same ;-).

Wednesday, March 30, 2016

Dollhouse Miniature Patio Table

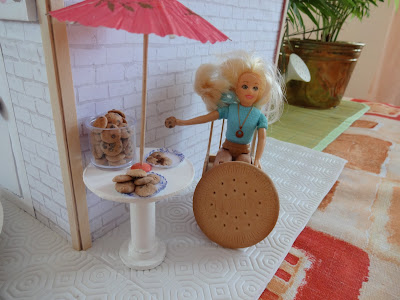
I made this simple patio table using circles on the top and bottom, cut out of a cereal box, glued together to make them sturdier and thicker.  The long part holding the table up is an empty spool of thread.  I glued it together, painted it, and added a matte sealer because I wanted it to look like wood.
The umbrella is a cocktail umbrella, and I am probably going to try to make the top part bigger.


Miniature patio table
Here's the cake stand in the cake display case. I also made a few more smaller cake stands, like the red one on the top of the display case.  I bought the silver platter at Micheals, and the pink tray is a metallic button. 

I think it's starting to look nice.  I can't wait to try some polymer clay cakes, donuts, cupcakes, and cookies!


Sadie is happy with our progress on our first dollhouse shop.  Rufus is still wondering where the treats are, lol.  I'm thinking I should have made a patio that goes all the way around, instead of just on two sides.  I like the look of the patio table where I have it, on the green place mat here.

 Here's a shot with my hand across the table from Sadie's hand.  She was wondering when we could start on the desserts and I was showing her how hard it is to work so tiny when I have such big hands, lol. 
Sadie and Rufus and I are sleepy; time to say goodnight! 


Thursday, March 24, 2016

Foamcore Dollhouse

I've been enjoying a week of freedom because I have the house to myself.  Of course, this means I get to "make a mess", aka craft, lol.  I have a cute dollhouse kit but have not tried to build it yet because I'm intimidated by it.  I decided to design my own very simple one room foam core dollhouse to practice on.  I'm so glad I did!
Foam core dollhouse WIP

 First I watched several zillion (or so it seems) videos on youtube, showing how to make and decorate cardboard dollhouses.  MyFroggyStuff on Youtube is awesome, and even though she makes mostly Barbie sized things, I learned a LOT.  Namely, she makes everything look easy when it's not, lol.
Add caption
 For example, in her videos she can cut straight.  Even with rulers, I cannot.  I did my best but my window and door openings are wonky.  I did manage to use some clear hard packaging plastic on this window.  I still have to make window sills. Thanks, Froggy, for teaching me how to do windows!
Entrance
 I love my little entrance.  My door, wonky though it is, swings open and closed on toothpick hinges, and the doorknob also turns and is held in place by a piece of toothpick and some glue.  I had to whittle the toothpick to make it fit into the bead hole.  Never thought I'd do that, lol. Again, thanks to Froggy for teaching me the technique. 
Interior
 I used scrapbook paper for the interior and exterior walls and I wish to heaven I'd have found suitable patio flooring scrap book paper, or roofing scrap book paper.  I found some real wallpaper pieces in the basement that I ma use for shingles but am unsure as of yet.  I kind of like the offwhite roof colour and the wallpaper is more of a tan colour.
Back Patio
I regret not cutting out another doorway on the back, but I wanted one full wall to play with on the interior.  The dolls and table are for scale.
My mini shop logo
I wanted this dollhouse to be a shop, either a bakery/cafe mix so I can experiment with making polymer clay cupcakes, donuts, cakes, cookies, etc.  I couldn't find a nice mini sign so I made one with a free logo maker online.  It's very simple but looks cute when printed on white paper and then glued onto pink foam sheets.

I bought some construction paper but it doesn't have brown or black; I couldn't believe it.  I really wanted black to make a chalkboard.  I found some chalkboard stickers instead but my white pencil crayon wouldn't show up so i had to use water color paint instead. I tried using puff paint but ruined a sticker.  The water colour paint looked like chalk so that was OK.

I still need to finish this and am running out of time.  I'm hoping to get the shingles, flooring, and window and door frames finished today,  and tomorrow I"m going to try to cut out some simple shelves, a display case, and a round table and some chairs. 

I highly suspect that I will be frustrated with making teeny tiny baked goods and will wish I had tried a Barbie sized dollhouse instead.  I would have, but I just don't have the space.  I did buy a faux Barbie at the dollar store and am tickled pink to have a Barbie again.  I bought some several years ago when I made Barbie items in plastic canvas, but I gave them all away.  I really loved that Barbie pool and picnic set.  I hope some little girl is enjoying it.

Saturday, January 12, 2013

Needle felted mini piggie and cage,

needle felted dollhouse mini piggie and cage

needle felted dollhouse mini piggie and cage with bottle, bowl, and bedding

Finger tip sized needle felted guinea pig

Needle felted mini guinea pig with cage, bowl, water dish, and bedding, in plastic canvas dollhouse
Before Christmas, I made this little mini guinea pig in what I hope is 1:12 scale, or close to it. It's the tiniest needle felt I've done so far.

I figured a guinea pig would be an easy way to start learning how to needle felt tiny items, and now I want to make lots of piggies, lol.   The cage is just green plastic canvas stitched together to make an open topped cage.  The bedding is newspaper.  The bowl is the thing you pull off coffee creamer bottles, and the water dish is a mni lightbulb.  I wanted to paint the tip silver but I didn't have any silver glass paint.

Monday, April 2, 2012

Mini baby doll wrap

Mini clay baby doll
 I wanted to make a little doll to fit my plastic canvas crib, so I came up with this.  It was really easy to make; I used a mold for the head (although for some reason, none of my heads look the same, even with the same mold, lol).  I used a tool to open the nose, and emphasize the eyes, and mouth.  I lightly "painted" with chalk...tomorrow I'll try another one with acrylics.
I put a wire in the head, and looped the bottom.  I attached a pipe cleaner to the wire, and wound the pipe cleaner around some fibre fill.  The blanket is a little piece of felt.  I glued it on, so that it looks like the baby is wearing a hat under the blanket.
I'm pretty happy with this, for a first try.  It's night and my lighting is bad, so I couldn't get a good picture, but I wanted to share, anyway.
I've been stressed out about my boy dog, Mac, and this little project let me escape for a bit.
Mini clay baby in plastic canvas crib (floating on some fibre fill so I could get the shot, lol)