Welcome to my blog

If you enjoy finding a lot of different outlets for your creativity, then we may just be kindred spirits.
This blog is an outlet for my interest in miniatures, crochet, plastic canvas, and many other various arts and crafts.

I also love walking, taking digital photos, and most recently, have rediscovered an old love...bike riding! I purchased an amazing new bike, a comfy Townie by Electra this summer, and have been having a grand time exploring the area as though for the first time. It's like being a kid again!

If you enjoy any of these things too, pour a cup of coffee and tea, sit down, and join me.


Take care!
Kat
Showing posts with label dolls house. Show all posts

Thursday, March 24, 2016

Foamcore Dollhouse

I've been enjoying a week of freedom because I have the house to myself.  Of course, this means I get to "make a mess", aka craft, lol.  I have a cute dollhouse kit but have not tried to build it yet because I'm intimidated by it.  I decided to design my own very simple one room foam core dollhouse to practice on.  I'm so glad I did!
Foam core dollhouse WIP

 First I watched several zillion (or so it seems) videos on youtube, showing how to make and decorate cardboard dollhouses.  MyFroggyStuff on Youtube is awesome, and even though she makes mostly Barbie sized things, I learned a LOT.  Namely, she makes everything look easy when it's not, lol.
Add caption
 For example, in her videos she can cut straight.  Even with rulers, I cannot.  I did my best but my window and door openings are wonky.  I did manage to use some clear hard packaging plastic on this window.  I still have to make window sills. Thanks, Froggy, for teaching me how to do windows!
Entrance
 I love my little entrance.  My door, wonky though it is, swings open and closed on toothpick hinges, and the doorknob also turns and is held in place by a piece of toothpick and some glue.  I had to whittle the toothpick to make it fit into the bead hole.  Never thought I'd do that, lol. Again, thanks to Froggy for teaching me the technique. 
Interior
 I used scrapbook paper for the interior and exterior walls and I wish to heaven I'd have found suitable patio flooring scrap book paper, or roofing scrap book paper.  I found some real wallpaper pieces in the basement that I ma use for shingles but am unsure as of yet.  I kind of like the offwhite roof colour and the wallpaper is more of a tan colour.
Back Patio
I regret not cutting out another doorway on the back, but I wanted one full wall to play with on the interior.  The dolls and table are for scale.
My mini shop logo
I wanted this dollhouse to be a shop, either a bakery/cafe mix so I can experiment with making polymer clay cupcakes, donuts, cakes, cookies, etc.  I couldn't find a nice mini sign so I made one with a free logo maker online.  It's very simple but looks cute when printed on white paper and then glued onto pink foam sheets.

I bought some construction paper but it doesn't have brown or black; I couldn't believe it.  I really wanted black to make a chalkboard.  I found some chalkboard stickers instead but my white pencil crayon wouldn't show up so i had to use water color paint instead. I tried using puff paint but ruined a sticker.  The water colour paint looked like chalk so that was OK.

I still need to finish this and am running out of time.  I'm hoping to get the shingles, flooring, and window and door frames finished today,  and tomorrow I"m going to try to cut out some simple shelves, a display case, and a round table and some chairs. 

I highly suspect that I will be frustrated with making teeny tiny baked goods and will wish I had tried a Barbie sized dollhouse instead.  I would have, but I just don't have the space.  I did buy a faux Barbie at the dollar store and am tickled pink to have a Barbie again.  I bought some several years ago when I made Barbie items in plastic canvas, but I gave them all away.  I really loved that Barbie pool and picnic set.  I hope some little girl is enjoying it.

Wednesday, October 2, 2013

Hermione Crochet Amigurumi

Hermione crochet doll
Here's my version of Hermione in crochet. She has a sweet face, with a little snub nose.  Her hair is very wild and bushy, mainly because this was the only brown yarn I had left, lol.  Poor Hermione looks like she has dreadlocks because the yarn is so thick, lol.

Ron and Hermione crochet
Hermione's has a removable school blazer, shirt, tie, and skirt.  Her knee socks and shoes were made as part of her legs.

Harry, Ron, and Hermione crochet
Here's the golden trio; aren't they cute.  Harry's little legs are too short, so I'm going to eventually remove them and make them longer, but for now he's fine.

Harry, Ron, and Hermione crochet
I sculpted wands and a broom out of clay for my little witch and wizards.  This was such a fun project; they make me smile every time I look at them.  I like the look of Hermione with her jacket off.

Hermione crochet

Hermione Crochet

Hagrid, Harry, Ron, and Hermione crochet
Harry's flying off to practice Quidditch, Ron is goofing around, Hermione is practicing her spells, and Hagrid is inviting them in for rock cakes and tea :-).


Thursday, September 12, 2013

Baby Mandrake Root in Polymer Clay for Hagrid's Hut


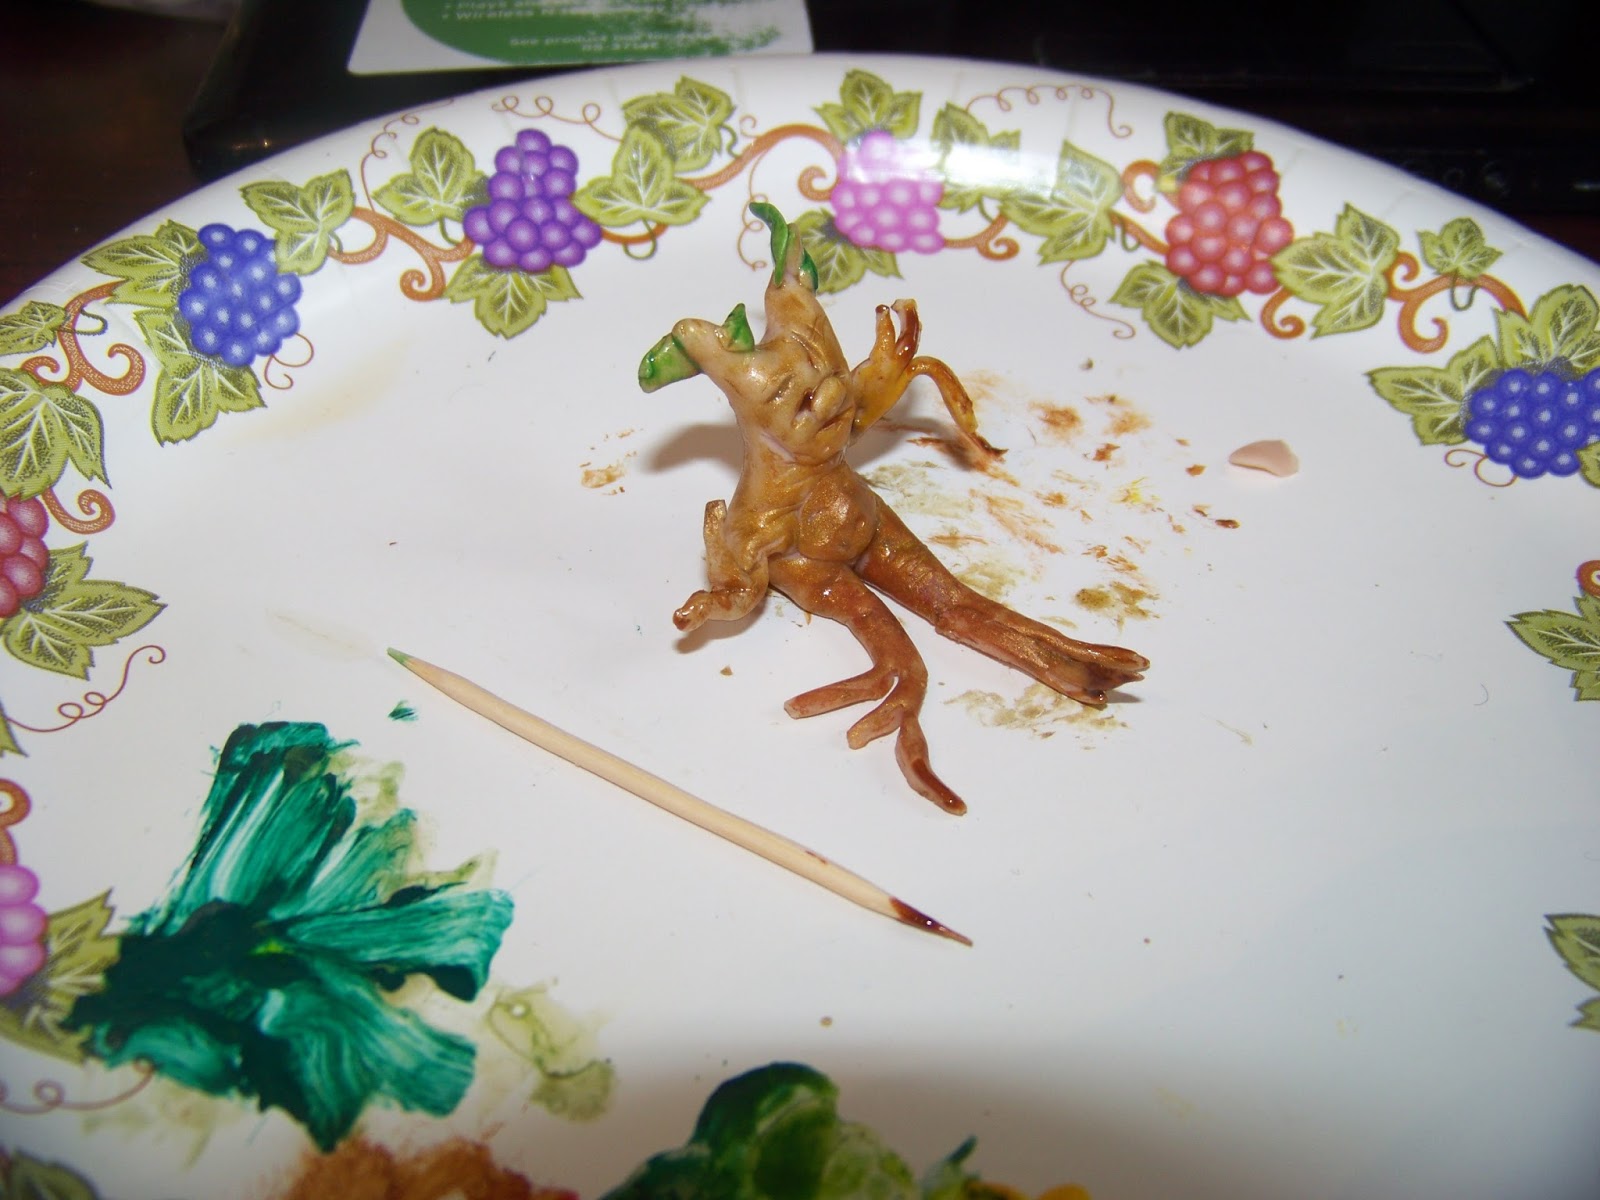
Baby mandrake in polymer clay
I am sooo loving this Hagrid's hut project, and I have to confess, making the tiny items to go inside the hut is a lot more fun than stitching the hut itself was, lol.

I know that Hagrid isn't Prof. Sprout, but I LOVE baby mandrakes and figured Hagrid should have one, especially since he is so into the care of magical creatures.  I am still learning how to use polymer clay (by reading books and tutorials online).  It's a lot of fun!

Learning to sculpt a tiny baby mandrake
The above pic shows my mandrake while he was baking.  One of his legs (roots) fell off and I had to glue it back on using liquid sculpy.  I re-positioned it so it wouldn't be so easy to break next time.
Painting tiny baby mandrake
I mixed green, brown, and yellow red to get different shades of brown.  I though the should be darker toward the roots and lighter in the face, with green leaves.  I didn't give him many leaves because he is just a baby and only starting to sprout :-).

Side view of baby mandrake

Little baby mandrake bottom, lol
I gave him a sort of baby bottom, but had to make him look rooty, so I drew lines down his back, and across his little behind.

Adding "soil" to baby mandrake
I dabbed a bit of white glue onto his limbs and used a toothpick to add some coffee grounds (grinds?). I even put a speck on his little cheek, lol.

Canadian Nickel and dollhouse size doll to show baby mandrake's tiny size
He's very tiny and it's hard to tell in the other photos so I put him beside a Canadian nickel and a little dollhouse doll, to show scale.

Baby Mandrake on Hagrid's table
 Here he is in Hagrid's hut, on the table. Hagrid's probably wondering where his earphones are. Believe it or not, I actually found earphones for Hagrid in a package of erasers I had purchased ages ago at the dollar store.  I'll take photos of the earphones in another post, after the baby mandrake's special Hallowe'en pot and piles of earth are done.
Baby mandrake on Hagrid's table

Making "soil" mounds and getting pumpkin ready to use as pot for baby mandrake
I mixed coffee grounds and white glue to make dirt piles.  I want to put one in the pumpkin, and one beside the pumkin, so it looks like baby Mandrake is being transplanted.  I also added some glue to the rim of the pumkin and dipped it in coffee grounds (grinds?).  Note to self; next time, let the used coffee grounds dry first, lol.

Making soil patties for baby mandrake
Needle felted Hagrid with ear muffs, repotting polymer clay baby mandrake in plastic canvas dollhouse
I found miniature earmuffs or headphones in a bag of erasers I bought at the dollar store awhile ago...perfect for this scene, lol (since the cry of a baby mandrake kill, lol).  I gave up on the coffee grains and used black wool batting for earth; it works perfectly.
Needle felted Hagrid, crocheted baby Norbert, polymer clay baby mandrake, porcelain poodle :-)
Hagrid's looking at me as if to say, "Can't you move these creatures so I can enjoy my rock cake in peace?" lol.

I'm allergic to all dogs except for poodles and have had poodles for over 20 years, so I figured my Hagrid should have a pet poodle, along with his pet baby dragon and baby mandrake, of course.

I love the baby mandrake; it was such a fun project. Now, what should I name him?

Monday, September 9, 2013

Hagrid's Hut in plastic canvas, interior, now with baby dragon Norbert

Good afternoon!
I hope the sun is shining, wherever you are.  Here it is raining  and dreary, but that's OK because yesterday I went for a 3 hour hike and am too sore today to do any walking :-).  I'll post some photos of the hike another time, but for now, would like to share Hagrid's Hut interior, complete with furniture and odds and ends.

Hagrid's Hut, plastic canvas, Interior, with Norbert, crocheted baby dragon in egg
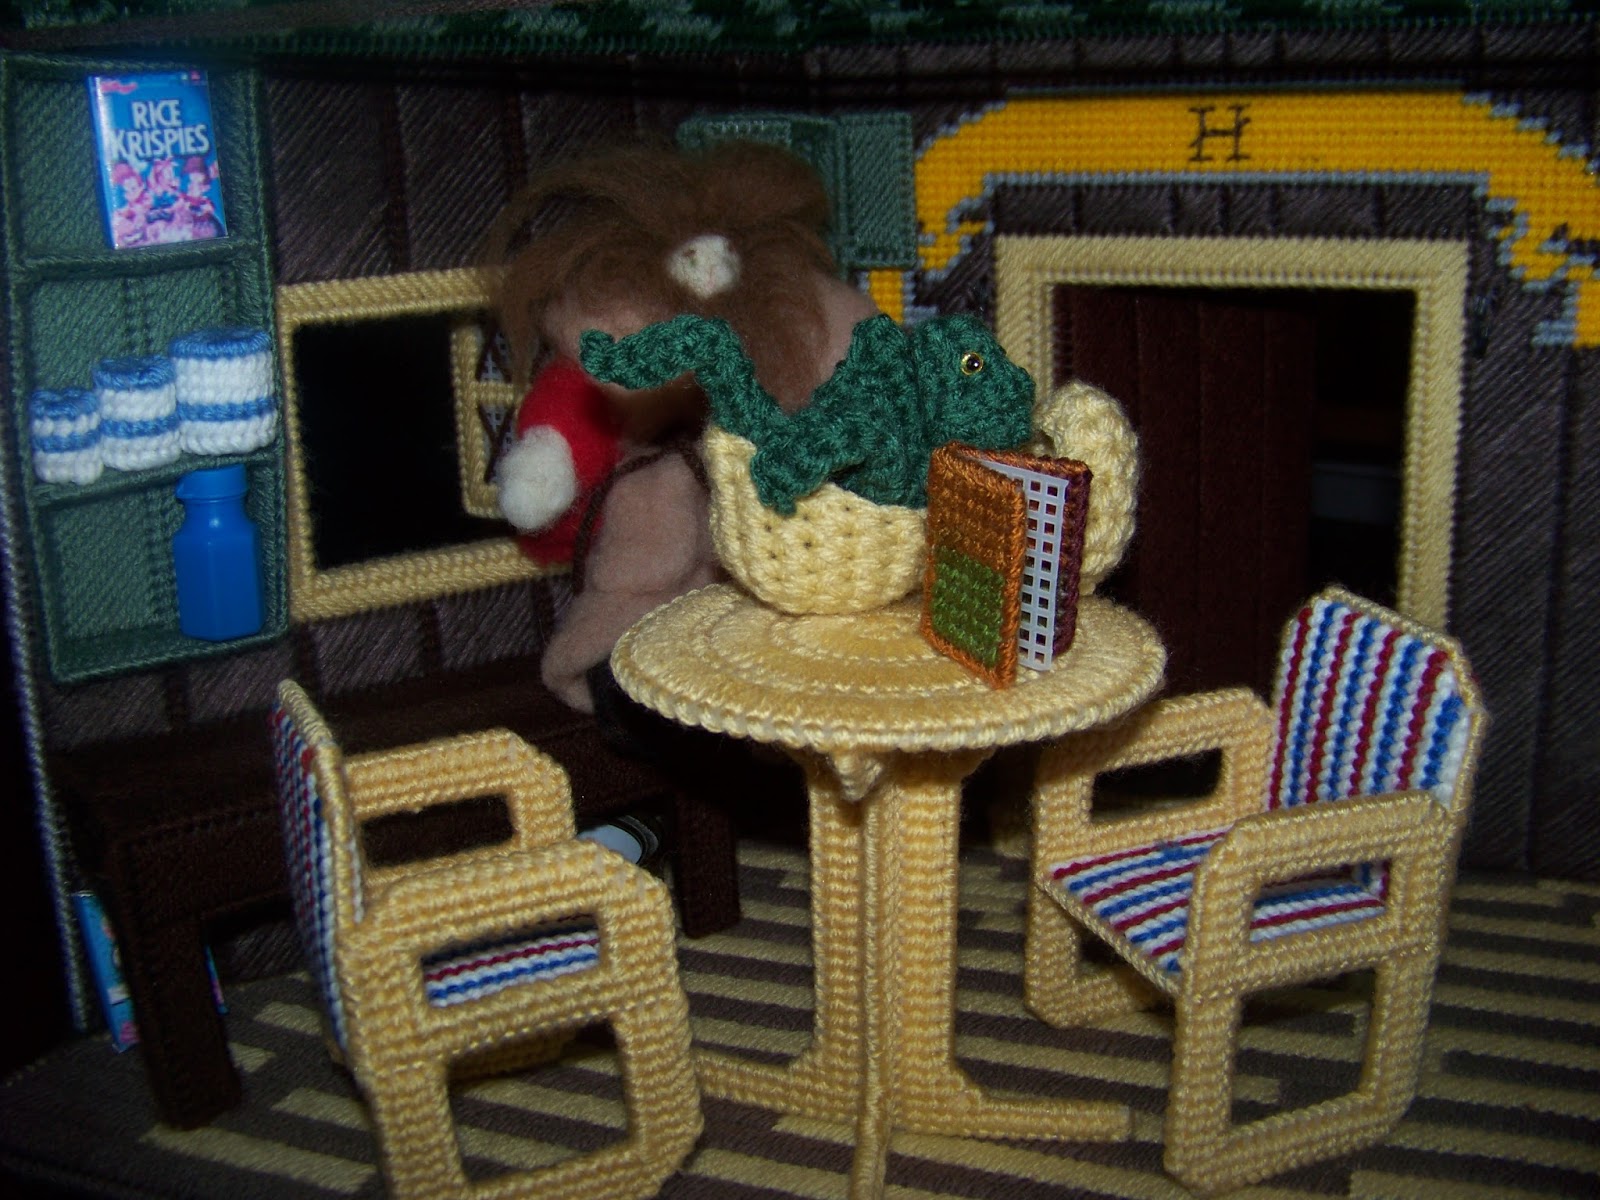
Here's a photo of the finished interior, with all of the items (so far).  Hagrid himself was needle felted. The dollhouse (hut), and furniture were all stitched on hard plastic canvas sheets.  I didn't have a pattern for the house or built in shelves, bench, and fireplace; I made those up myself.  The table and chairs, fire logs, log holder, book, and canister set are all Barbie sized furniture.  Since Hagrid is half giant I figured his items should be a lot bigger than standard sized dollhouse furniture.  I plan on making little Harry Potter, Ron, and Hermione dolls, and I want the furniture to be too big for them, the way Hagrid's is for the movie kids.

Hagrid's Hut, fireplace with cauldron.
 The plastic canvas fire and logs can be removed from the fireplace, so the fire can be burning or not. I purposefully made the fireplace deep enough to hold a hanging cauldron.  I just found some Hallowe'en candies in tiny plastic cauldron shaped pumpkins, and I think I'm going to wrap the crocheted cauldron around that to give it the right form (and handle).  I'll take more photos if it works out.

Hagrid's Hut interior

Hagrid's Hut, crocheted baby Norbert dragon in eggshell
Here's my version of a baby dragon, Norbert, in an eggshell.  He has a curly tail, wings, and a long narrow body, just like the movie version.  I didn't have green or grey thin yarn so had to use worsted.  He's cute, but I'd like to try him again with lighweight yarn, so I can add more details, like ridging along the head, and webbing on the wings.

Hagrid's Hut, interior, canisters on shelf

Needle felted Hagrid, Plastic canvas Hut and furniture, crocheted Norbert

Hagrid's hut, interior

Hagrid's Hut, interior, with plastic canvas fire in fire place

Hagrid's fireplace, plastic canvas, crocheted cauldron
I had a lot of fun with this project.  Hope you enjoyed the photos!

Take care.

Thursday, August 1, 2013

Hagrid's Hut doll house in plastic canvas, complete


It's been awhile since I finished this, but I haven't had a chance to post.  This is the first large item I've designed myself, and although I'm pleased, there are a few things I'd do differently if I were to make it again.
Hagrid's hut dollhouse, plastic canvas
The first thing I'd do is to make the doorway higher.  I decided against it because I was concerned that it would make the canvas too bendy but I think I could have gone an inch higher.  Because Hagrid is half giant, it's OK that his head is level with the door frame.  I still have to put the decoration over the top of the doorway...I made a sort of bull scull decoration but I'm not sure it suits Hagrid. I may just hang a lantern there instead, or stitch a sign that says "There be dragons here".

Hagrid's Hut dollhouse, plastic canvas
If I were to do this again, I'd make very sure that all of my walls were the same size.  They started out the same size, lol, but I accidently put one the wrong way and made it taller and shorter, and rather than redo the whole wall, I just undid the top row of stitches and cut it down.  But that makes the left wall one row shorter than the others.

Hagrid's hut dollhouse, plastic canvas
I'm happy with the doors and windows that open and close, and I like the front pillars.  It was really hard to figure out how to get the shape of the roof, but I think I managed.

Hagrid's hut dollhouse, plastic canvas, side view
The roof is very tall, which makes the house very large, and hard to store, so instead of making an attic level, I used doubled yarn to tie the two sides of the roof together.  When I release the yarn, I can fold the roof down and into the house for storage, which allows it to fit on a shelf.  I thought that was a good idea, but if I were to make it again, I'd probably make a second level and not leave the roof as collapsible, because I haven't collapsed it yet, lol.  I plan to use the yarn as a beam, and to hang baskets or pelts from it, like Hagrid does.

Hagrid's hut doll house plastic canvas
Here's another side version, showing the pillars.  I really like them; they add to the house.  If I did this again, grey and moss green for the roof, but I decided to use the colors I had on hand as I'm moving soon and didn't want to bring even more things that would need to be packed.


All in all, I'm happy with this (and needle felted Hagrid seems to like it too, lol).  I plan to make some accessories to go inside, but that may have to wait until after I  move.
Take care!


Friday, June 28, 2013

Hagrid's hut plastic canvas dollhouse, inner walls completed


Plastic canvas Hagrid's Dollhouse, inner walls

Plastic canvas Hagrid's dollhouse, inner walls
 I've been working on a plastic canvas Hagrid's Hut dollhouse, to go along with my needle felted Hagrid doll.

I can't believe how much fun I'm having with this project (or how obsesses I'm becoming over it, lol).

I am not following a pattern, so I looked at several photo's of Hagrid's hut online. Hagrid's hut seemed to change from movie to movie, with some showing wooden walls, other's showing stone walls. My version has both the dark walls, with some stone around the fireplace, and the bench, just like the original, but I added some other touches for color, like the banner over the door, the Gryffindor crest over the fireplace, and the green shelves.

As I stitched, I caught myself imagining that this was the new Hut, built after the fire in the last movie, lol.  The crest is magical, of course, and it changes color, so I outlined it with the normal red and gold, and used different colors inside.  The crest wasn't originally magical...the idea just formed in my head, lol, because I realized as I stitched that the person who created the crest pattern used the wrong colors.  Here's the link to the free pattern, if you'd like to try it yourself: http://pdfcast.org/pdf/harry-potter-plastic-canvas-patterns  I'll also try to embed it below, but if it doesn't work, just click on the link above and it will take you to the pattern.  There are crests for the other Hogwarts houses as well.


Plastic canvas inner walls for needle felted Hagrid's dollhouse

Needle felted Hagrid, showing off his fireplace 
 Hagrid seems pleased with his magical color changing crest, doesn't he?

The fireplace is 3 holes deep on the inside, although it's hard to see in the photos.  I'm going to try to sculpt a fire to sit inside.

The doorway wall has two hooks on either side of the door frame.  My plastic canvas lantern is hanging on the link.  I'm going to sculpt a candle to set inside (the top of the lantern comes lifts off, so it will be easy to add later).

So far, everything except for the banner and crest was made without a pattern.

The house is a bit bigger than standard dollhouse size, because Hagrid is half giant.

I'm going to start working on the outer walls next, then I'll do the floor.  I'll do the roof last.  I want to make beams that lay across the walls, to hang items like cooking utensils, baskets, and ropes, just like in Hagrid's movie hut.

I'm also going to make a round kitchen table, and possible an easy chair.
Needle felt and plastic canvas, Hagrid's Hut
I'm having a lot of fun with this project; I can't wait to see how it will turn out.

I hope you enjoyed the photos.

Take care!