Welcome to my blog

If you enjoy finding a lot of different outlets for your creativity, then we may just be kindred spirits.
This blog is an outlet for my interest in miniatures, crochet, plastic canvas, and many other various arts and crafts.

I also love walking, taking digital photos, and most recently, have rediscovered an old love...bike riding! I purchased an amazing new bike, a comfy Townie by Electra this summer, and have been having a grand time exploring the area as though for the first time. It's like being a kid again!

If you enjoy any of these things too, pour a cup of coffee and tea, sit down, and join me.


Take care!
Kat

Sunday, March 25, 2012

Plastic canvas dollhouses

I made room on that store shelf I bought years ago, and it's perfect for displaying my PC dollhouses!
Plastic canvas dollhoues I've stitched, from left to right,
Haunted dolhouse, Bear cottage, My Pnk Dollhouse.

Plastic canvas dollhouses
I don't know if they look better in the first arrangement, or the second.  I can fit the plant behind the bear cottage in the second arrangement, but not the first.
Plastic canvas dollhouses with needle felted critters and small dolls.
Here they are with some of the needle felted critters I made, and some small dolls I found in my collection.  I made the needle felted critters before I made the houses, and then tried to make them a place to live.  The Bear cottage was the first house I made for them, but they quickly outgrew it.  I love the Haunted dollhouse, with it's dilapitated look, it's crooked shutters railings, but the critters didn't suit it so I made the pink dollhouse.  It took me 3 months to stitch the pieces and 5 days to stitch those pieces together.  I still have to make one more piece of furniture for it.  I wonder if the wooden dollhouse kits I bought will take as long to put together?  At least I won't have to stitch the walls, floors, and roof first, lol.  Just sand and paint them...yikes.

I just got another PC dollhouse pattern, for a Christmas mansion, and I think I'd like to try that next.  It seems smaller than the pink dollhouse, based on the furniture size, but it has wonderful details, including a staircase.

Doll size for Pink plastic canvas dollhouse

Pink Plastic Canvas dollhouse
Some ladies in my plastic canvas group are going to start on the pink dollhouse that I finished in early March,


Side view pink plastic canvas dollhouse
and they were asking me what size dolls would fit.  I made the house for my needle felted critters, but I looked for dolls to fit the house too, so I could see which ones would fit. 


Pink plastic canvas dollhouse, back view


The ceilings in the house are 7 inches high, so the regular 1:12 dollhouse dolls seem too big; at 6 inches tall, the adult heads are pretty close to the ceiling.


Kitchen, Pink plastic canvas dollhouse
I found some little dolls in my collection that work.

The lady doll is 5 inches tall, and the boy is 4 inches tall.


Living room, pink pc dollhosue
She seems to fit well; she's short enough so that her head is lower than the door frame and picture frames.


The boy fits nicely too.  It's too bad they're so rigid.
Pink plastic canvas dollhouse, nursery
I found some doll families on ebay that would be the right size, and put in a bid.

Pink pc dollhouse, bathroom
I still have to make a bed for the green bedroom; it's still very bare.
Pink PC dollhosue, green bedroom

I'm bidding on two families on Ebay, and am winning both bids so far.  There's one hour to go on the first family, and 6 hours to go on the other. If I don't win, it's OK, as I've seen these families on ebay before. They're vintage; one set is from the 1970's, dressed in that style, which I think is cool.  The others are newer, and dressed in Victorian style.

Last night I bought a 56 piece Greenfield furniture set on ebay, at a buy it now auction.  I'm really excited about that, as I like the look of the furniture, and there's enough to fill 7 rooms.  I bought the Laurel and Primrose dollhouse kits (wood), and they'll have 7 rooms to fill, so that's perfect.

I've been getting a lot of migraines, so I keep putting off stitching the bed for the green room.  Tilting my head to look down while I stitch makes the migraine worse.  I don't know why I'm getting so many lately; hopefully that will pass soon.

I'm really excited about learning how to put the dollhouse kits and furniture kits together.  This is an addicting hobby.  I have to make sure to make time for my writing, reborning, and needle felting.  Oh, and plastic canvas.  I love plastic canvas. 
I need something hot to drink; it's really cold and windy here today.  I think I'll make a nice mug of hot chocolate and go read my emails.
Take care!

Saturday, March 17, 2012

Miniature crochet

crocheted pillow, afghan, placemat
I crocheted my first mini stuff (not counting Barbie stuff, which I've done in the past).  This is a lot smaller than Barbie items...it's on the 1 inch equals 1 foot scale, which is known as 1:12 (why not 1:1?).

I've got a very simple afghan, placemat, and granny square pillow, all done with crochet thread and a very small hook.  I couldn't get a picture showing the pink center of the pillow...it's too sunny here; not that I'm complaining.  The sun is lovely.


Here's the other placemat, on the kitchen table.

Thursday, March 15, 2012

T5 challenge still working on

I'm still working on this, but I'm running out of time...I only have until St. Patrick's Day, on the 17th.
I probably won't even enter this, as I'm such a newbie and unsure what I'm doing yet, lol.
Here's what I have so far...I still want to touch up the paint and add a few more items, fix a few things...
T5 challenge in progress, unfinished


I may not be able to enter the challenge even if I wanted to, because I used spackle.  I've never used it before, and wanted to try it out.  It was cool...like frosting a cake.  I should have used more, but I didn't know if it would stick to cardboard or not.

OK, so here's what I used so far:
1. stir sticks-dock, rowboat.
2. toothpicks-dock
3. beads-sculls, bone, little silver thing that looks like a beer holder to me, lol.
4. feathers-part of two feathers, cut up, used for plant, stem of feather, cut used for base of sword, part of telescope (this is REALLY tiny).
5. Qtips- boat oars (1 qtip cut in half), part of telescope (feather stem and qtip stem, inserted in eatchother to make it)
6. Paper clip - parts of 1, cut up and twisted for oar locks
7. card stock - bottom of boat
8. small box - under rock on the right
9. paper -one sheet crumpled and painted to cover small box for rock on the right, half a sheet for photo image

I tried to make a treasure chest out of card stock, but failed miserably.  I can't get the printie to print to scale.
T5 in progress


I still had to use caps, so I found this cap for my ventolin inhaler (upper right), which sort of looked like a crate.  It's blue, so it doesn't go.  I tried using marker to color it, but it didn't work.  I don't know if paint will stick, as it's plastic.  I still have to use foam cards and felt, so I may cover it with strips of either of those. I put a piece of felt in it to remind myself, lol.

Oh, I was allowed to use an extra item not on the list, so I used part of a bobby pin for the sword.  The "handle" of the sword is another small piece of feather stem.  I painted the handle brass.

If only I had some experience, this could be really cute.  Everything I'm making is very amateur, which makes sense since I am an amateur, but it's frustrating when my brains sees something my hands can't make, lol.

I found the perfect sticker, in the shape of an anchor.  Once I add that, I'll have 10 items from the list.  If I can cover the ventolin cap with foam or felt, I'll have used 12 items from the list.  I plan to use the tea from a teabag for soil, but first I'm going to make a cup of tea, drink it, lol, and save some to dye a tiny piece of paper for my treasure map.  I plan to cut up pieces of an eraser to use as gold bars.  Oh, and the ribbon; I'm going to make a tiny flag from part of  the ribbon, and use the rest as a tether for the boat. So that will be 15 items on the list. Which means I still have to use 5 more!  There's no way, lol.  I can't even remember what else is on the list; I'll have to check.  I wish the list was made in word instead of pdf so I could just copy and paste it.

I was going to use bottle caps for the dock, which has turned into a sort of bridge/ladder, but it didn't look right.  Then I was going to use the push pins/thumb tack bases for the base of the dock, but I couldn't pull the pins out of the plastic.  I was afraid to cut them out, because it's been my experience that cutting things like that makes the tip go flying and those are sharp...I don't want my dogs to step on them.

I suppose I could use the foam board stuff and cut it in the shape of waves, but that would be tacky.  And not thumb-tacky, which I could use.

I was going to use cotton balls as white caps on waves...maybe I still can? I wonder if cotton balls can be needle felted?  If so, maybe I can needle felt a little pirate.

I only have one toothpaste cap, and it's on my toothpaste, so I'm using the ventolin cap as the toiletry cap. I keep my ventolin in the washroom medicine cabinet, so hopefully that will work.

I was thinking of using the toothpaste cap as the end of a cannon.  Maybe I can use the foam board stuff as a cannon?

Stick pins...I guess I could use them to secure the box/paper rock more securely?

I'm getting a headache, lol.  I wish I would have joined this group sooner, so I could have had more time.

Oh well, it's fun, and it's giving me some experience at thinking a different way.


Wednesday, March 14, 2012

T5 challenge continued

Well, I'm making a big mess with this challenge, lol.
So far I've used the stir sticks, toothpicks, paper, box smaller than 3 inches, qtips, bottle caps, feathers, beads.
Here's a picture (nothing but the box and photo are glued in yet, and not all items are in the picture.
T5 challenge in progress

It's not that nice looking.  Apparently my imagination is miles away from my ability, lol.  I know how I want this to look, but can't seem to do it.

I'm far from done, and there are only a few more days left in the challenge.

It doesn't help that I don't know how to use printies.  I found the cutest little treasure chest printie, but I can't shrink it down enough.

This photo shows the boat, made from stir sticks, the dock made from 4 toothpicks and stirstick left overs from the boat.  The dock is held up by two bottle caps on one side, and the small box covered with crumpled and painted paper (to look boulder like, lol) on the other side.  I have oars made from one double ended qtip, but it's still wet.  I want to make an anchor from a paper clip, and a sword from a paper clip and paper, if possible.  I have some feather trees, but thery're still wet.  I'm going to use the tea from the inside of a teabag as dirt, with part of a buried treasure (more beads) sticking out.  I wanted to make a little shovel.  I still have to use foam, more paper (not cardboard or poster board...I can't think of the name...some sort of paper board, lol).  I'm going to use part of the ribbon as a flag, and part of the ribbon as a rope to tie the rowboat to the dock.
I'm supposed to use thumbtacks...and I forget what else.

Sunday, March 11, 2012

Bathroom furniture, for Plastic Canvas dollhouse

plastic canvas bathroom 
I finished the bathroom for my Pink Plastic canvas dollhouse.  The pattern didn't call for a flusher thingy for the toilet, or for facets, but I wanted to add them.  I have to buy silver paint next time I go shopping.  This is a copper color.  I have gold, but it's icky.
I want to make a little glass with a tiny toothbrush for the sink, and I want to drape a towel over the side of the tub.


6 inch tall felted bear in tub
Here's my 6 inch tall bear in the tub, for scale.

Saturday, March 10, 2012

T5 challenge

Well, I joined a Canadian online miniature group, and they're having a trash to treasure challenge.  The ladies are all very talented, so my attempt at this challenge is going to fall far short, but I want to try, anyway.
When I first read the list of items we have to use, an idea popped into my head right away.
I read "napkin, tea bag," and thought "Treasure map!"  I thought I could dye the napkin with the tea and crumple the napkin up to look like an old treasure map.  I thought it would be cool to make it a 3D treasure map, with a sunken boat (the mast made of toothpicks sticking up out of the water), an anchor (paper clip),rickety falling apart dock (stir sticks and toothpicks), rowboat (stirsticks), skull (beads from Halloween), palm tree fronds (feathers painted green).  I'm allowed to use felt, a piece of green material, a piece of card stock, foam board, and other things.  We're allowed to use glue and whatever else we need to put it together...I wonder if that includes spackle, so I can make some caves?
Anyway, I have no experience with minis (other than my plastic canvas dollhouses), so even though I have lots of ideas, I don't know if I can put them into practice.
I tried playing around today, and this is what I have so far.  It's very rough...I was just trying to see if it could be done.  There's no stain or paint or anything, and the clamps are still holding the pieces together:
Rickety dock out of 4 toothpicks, 2 caps, part of one stir stick.  Rowboat from stir sticks, left overs from dock. 


After the glue dries, I'm going to paint the caps grey to resemble cement, and stain the dock and boat.  I have to make a bottom for the boat, out of card stock.  I have weird looking toothpicks that I found at the dollar store that will make perfect oars when cut in half.  The toothpick sticking out of the boat isn't part of the boat; I just put it there to give the clamp something to hold onto.

Mac is on the Mend

I had a scare yesterday. I took Mac to the vet and he tripped on the vet's doorstep and fell, hard.  He cried and cried, and just lay there on his side.  I had to help him up.  Then he fell again on the stupid ceramic tiles in the vet's exam room.  Why on earth wouldn't vets make sure they have no slip runners for the dogs to walk on safely.  I think he hurt himself badly at the vet.
The vet checked him and thought it was Mac's spine.  I had to leave him there for tests and I was a complete basket case.  Thankfully, the xrays and blood tests all came back good.  There's no fractures, no infection, and his discs look good.  The vet thinks he just has inflammation, which is causing pain.  So he gave Mac a shot, and sent him home with prednisone and antibiotics.  I usually get prednisone and antibiotics when I'm sick, so I feel better knowing he's taking these.  He took his pills last night without problem (I hid them under peanut butter, smeared on a dog treat.  Then this morning I hid them in his cream of wheat.  He ate them right up.  The vet said he should start to feel better within a day or so.  He went outside to pee this morning without problems, but I leashed him so he couldn't go far.  He ate and drank and I told him to go lie down and relax, and he did.  He's sleeping on the couch now. I feel so much better that he's on the couch.  I love that dog.

Wednesday, March 7, 2012

Dollhouse furniture, kitchen

plastic canvas dollhouse furniture, kitchen


Hello!  I finished the kitchen furniture for my pink plastic canvas dollhouse today.  I love the little stove.  The pot and frying pans are erasers from the dollar store; so cute!

I found some tutorials that I'm dying to try.  One is for a mini wall clock, made out of a button, printie, and epoxy resin.  The other is a newspaper made from a printie, paper, and modge podge.
I don't have any epoxy resin; I'm going to look for some next time I go out.

I think I'm going to call the vet back tomorrow.  Mac hurt himself on Sunday night.  He ran into the screen door; neither of us noticed it was closed.  I've since put long strips of masking tape on the screen so we can see it better, but the poor guy already hurt himself.  He's walking without limping, and he went upstairs twice today, and all the way to the back of the yard 3 times, but he whimpered tonight when he took a step.  If he sprained his ankle, he's probably in a lot of pain.  I sprained mine last month and it still hurts if I step wrong, or drive (or walk too much).  I'm hoping the vet will be able to give him something for pain.  I love my boys.  Mac is a big guy, but he's still my baby.

I hope everyone is having a nice evening.  Good night.

Monday, March 5, 2012

Pink Dollhouse, Complete!

Pink plastic canvas dollhouse


Here's the completed dollhouse, from the "My Pink Dollhouse" pattern book, by Karen McDanel, printed by the American School of Needlework in 1993.

It took me about 2 months to cut out and stitch all of the individual pieces, and 5 days to put all of the pieces together (I blogged about the steps earlier).


Interior of house


Here's the interior of the house.  I used sparkly Christmas ribbons to stitch the mirrors, and the fire in the fireplace.  Everything else was stitched with Walmart super saver yarn.  I already stitched up some of the little pieces of furniture...the crib, toilet, fridge, and couch.  The coffee table is from the dollar store, and fits in perfectly.  I still have to make the rest of the furniture...the stove, kitchen table and chairs, tub, sink, bed, easy chair, and end table.

You can't see it in this picture, but I goofed big time when assembling the inner house.  I don't know how, as I kept chanting "make sure the windows are on the outer walls" as I stitched them together.  I stayed up too late the night I put the inner house together, ended up putting the living room fireplace on the outer wall, and the window wall on the inner side.  I think it's because I kept thinking that the fireplace should have been on the outer wall, with a chimney on the side; I don't know.  It bugs me because I was aware that I might make a mistake and made it anyway, lol.  Oh well; it's still cute.  Maybe I can find a way to disguise the inner wall, and put curtains over the pictures by the fireplace so they look like windows showing an outside scene.

The Nursery


The nursery is my favorite room.  Everything is plastic canvas except for the rocking horse (Christmas ornament), crocheted dress and slippers, gift box (made from a "printie", which is just a printable picture that can be cut and folded), gift bag (another printie), and little felt duck (the size of a penny, in the gift bag). The hangers are made from paperclips.

When I made this room, I didn't have the pattern book yet, and the e-copy that I was using was very blurry. I couldn't see what was supposed to be in the frame so I put the ducks in...they were originally supposed to be magnets, lol.  I don't know why the duck necks look so long in the photo when they look OK in real life; it must be the angle of the photo.  I used sparkly ribbon for the mirror, and crochet thread for the little dress and slippers.

Living Room


The living room is my second favorite room, even though I goofed.  I just love the fireplace.  
Everything here is plastic canvas except for the coffee table (dollar store), box of cookies (printie), and plates (plastic inserts from diet coke bottle caps).

Livingroom again, showing my goof up...I reversed the inner and outer walls.
The windows should be on the outside.  Then again, fireplaces are usually
on the outside walls.  Maybe I can disguise the windows somehow, lol.


Here's a photo showing my mistake.  Now, how can I hide those windows, lol?


Kitchen, with fridge open


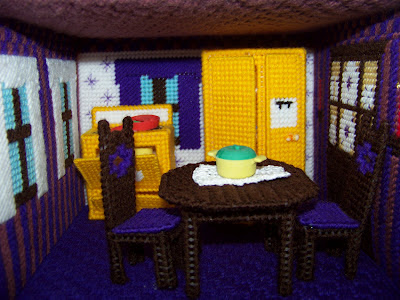
Here's the kitchen (with the windows on the right walls, lol).  The pattern (for all of the kitchen walls) was supposed to be like the back wall, white with little purple stars, and a purple and white border.  I hated the look of those stars (they look too spider like, lol), so I did the other two walls in purple and mauve stripes, with a matching border.  The fridge doors open and close, and there are 3 shelves for food.  I have little erasers shaped like food inside.  I found them at the dollar store and only bought one package because I wasn't sure they were the right size, but they are.  There's a little pot with a lid, a tv dinner, and two frying pans, one with bacon and eggs inside (I can't remember what's in the other one).  I have all of the pieces for the stove stitched...I just have to put it together.  Then I'll do the kitchen table and chairs.

Bathroom


I love the "tiles" on the bathroom walls.  The pattern is perfect for faux tiles.  The pattern also called for embroidering flowers in the white tiles, but they looked too spidery so I left them out.  I like this cleaner look.  Above the toilet, there's a cabinet with towels stitched right onto the wall.  On the opposite wall, harder to see, there is a mirror, and two towel racks, with a hand and bath towel.  I still have to make the tub (it will go under the window, and the sink (which will go under the mirror).

Bedroom


This is the master bedroom, with a stitched on dresser with mirror, and photos.  The plants in the photos aren't in the pattern book; the ones in the book are much nicer, but I didn't have the book yet, at this point, and was using a very blurry e-copy of the book.  After I stitched this room, a friend sent me a better e-copy of the pattern book, but I didn't want to pull out the stitches to start over so I left it as is.  I think it's cute. I was able to buy a hard copy of the pattern book recently, so if I ever do this house again, I'll be able to put the right paintings/photos in the frames, lol.

Close up of fireplace


Here's a better shot of the fireplace and outer door.  I really love this room, despite the mistake, lol.


Close up of "towel cabinet"


Here's a better shot of the inner bathroom wall.

The toilet lid can be opened or closed.


Close up of nursery


Here's another shot of the nursery.  The little felt duck in the gift bag is the smallest thing I've ever sewn.


Livingroom with doll to show scale.


This dollhouse doll came in a package with a daughter (I can't find her).  I added her to show scale, but this won't be her house.  My needle felted critters will be moving in, since they're unhappy in the Haunted Dollhouse.


Saturday, March 3, 2012

Dollhouse construction day 2 and 3

Inner house


Well I was wildly optimistic to think I could construct this dollhouse in one day.  Here's day 2, the inner house, complete.  It was saggy so I used small dowels in between the first and second stories to firm it up a bit.  Once the inner house is sewn into the outer house, it will firm up even more.

This video was supposed to appear later in this post, lol. I don't know how it arrived up here, and I don't know how to move it down; oops.
Inner and outer house, side by side


Day 3 of construction (yesterday), I sewed the outer house walls together, along with the floor.
Porch construction


Last night I added the porch roof, and the porch front and side walls.  These were awkward to sew onto the main shell of the house because the house is so big it was hard to hold and sew at the same time, yet too floppy to just leave standing on the table while I sewed.   I stopped after midnight last night.


On another subject, we had quite a snowfall last night.  We have a winter storm warning in effect today, with white out conditions.  Here's a video I took this afternoon, of the birds, eating at my deck.  They were so unafraid they let me stand right there with the door open as the landed all around me.  The bird video (above) is supposed to go here, lol.
Birds on my deck after March snowfall
Also on another topic, my reborn doll sold on ebay; woohoo!
Latest reborn, sold on ebay yesterday


Thursday, March 1, 2012

Putting pink dollhouse together.

Putting pink dollhouse pieces together
I stitched these rooms together.  They look like little roomboxes; so cute.  Tomorrow I'll stitch these together to form the first two floors of the inner house.  Then the attic, and then the outer house.  Hopefully I'll finish it all tomorrow.