Welcome to my blog

If you enjoy finding a lot of different outlets for your creativity, then we may just be kindred spirits.
This blog is an outlet for my interest in miniatures, crochet, plastic canvas, and many other various arts and crafts.

I also love walking, taking digital photos, and most recently, have rediscovered an old love...bike riding! I purchased an amazing new bike, a comfy Townie by Electra this summer, and have been having a grand time exploring the area as though for the first time. It's like being a kid again!

If you enjoy any of these things too, pour a cup of coffee and tea, sit down, and join me.


Take care!
Kat
Showing posts with label sculpey. Show all posts

Wednesday, April 6, 2016

Miniature Pies

More pies, lol.  I get hungry making these polymer clay desserts for some reason.  I made the apple and lemon pies today, and the blueberry and pie crusts yesterday.
Mini pies for the dollhouse bake shop
Polymer clay miniature apple pie
 The Apple pie is my favorite; I used new techniques that I learned from watching SugarCharmShop's tutorial
Polymer clay mini lemon meringue pie
 The lemon came out OK but my yellow is too yellow-y.  I tried making it lighter by mixing it with white polymer clay but it gave it a green tinge so I used it as is.  The meringue is white polymer clay mixed with liquid sculpey.  I mixed a bit of yellow polymer clay with liquid sculpey to get the goopy lemon look on the bottom of the pan.  I have to tint the edges of the meringue golden brown later; not sure what paint I should use on baked clay.

Sadie is very happy with her pies, but she's rather a messy eater.  She spilled pie filling on the table ;-).

Saturday, September 14, 2013

Sculpting Grinchy Christmas Ornaments

Polymer clay Grinch, Max, and Cindy Lou Who in plastic canvas dollhouse
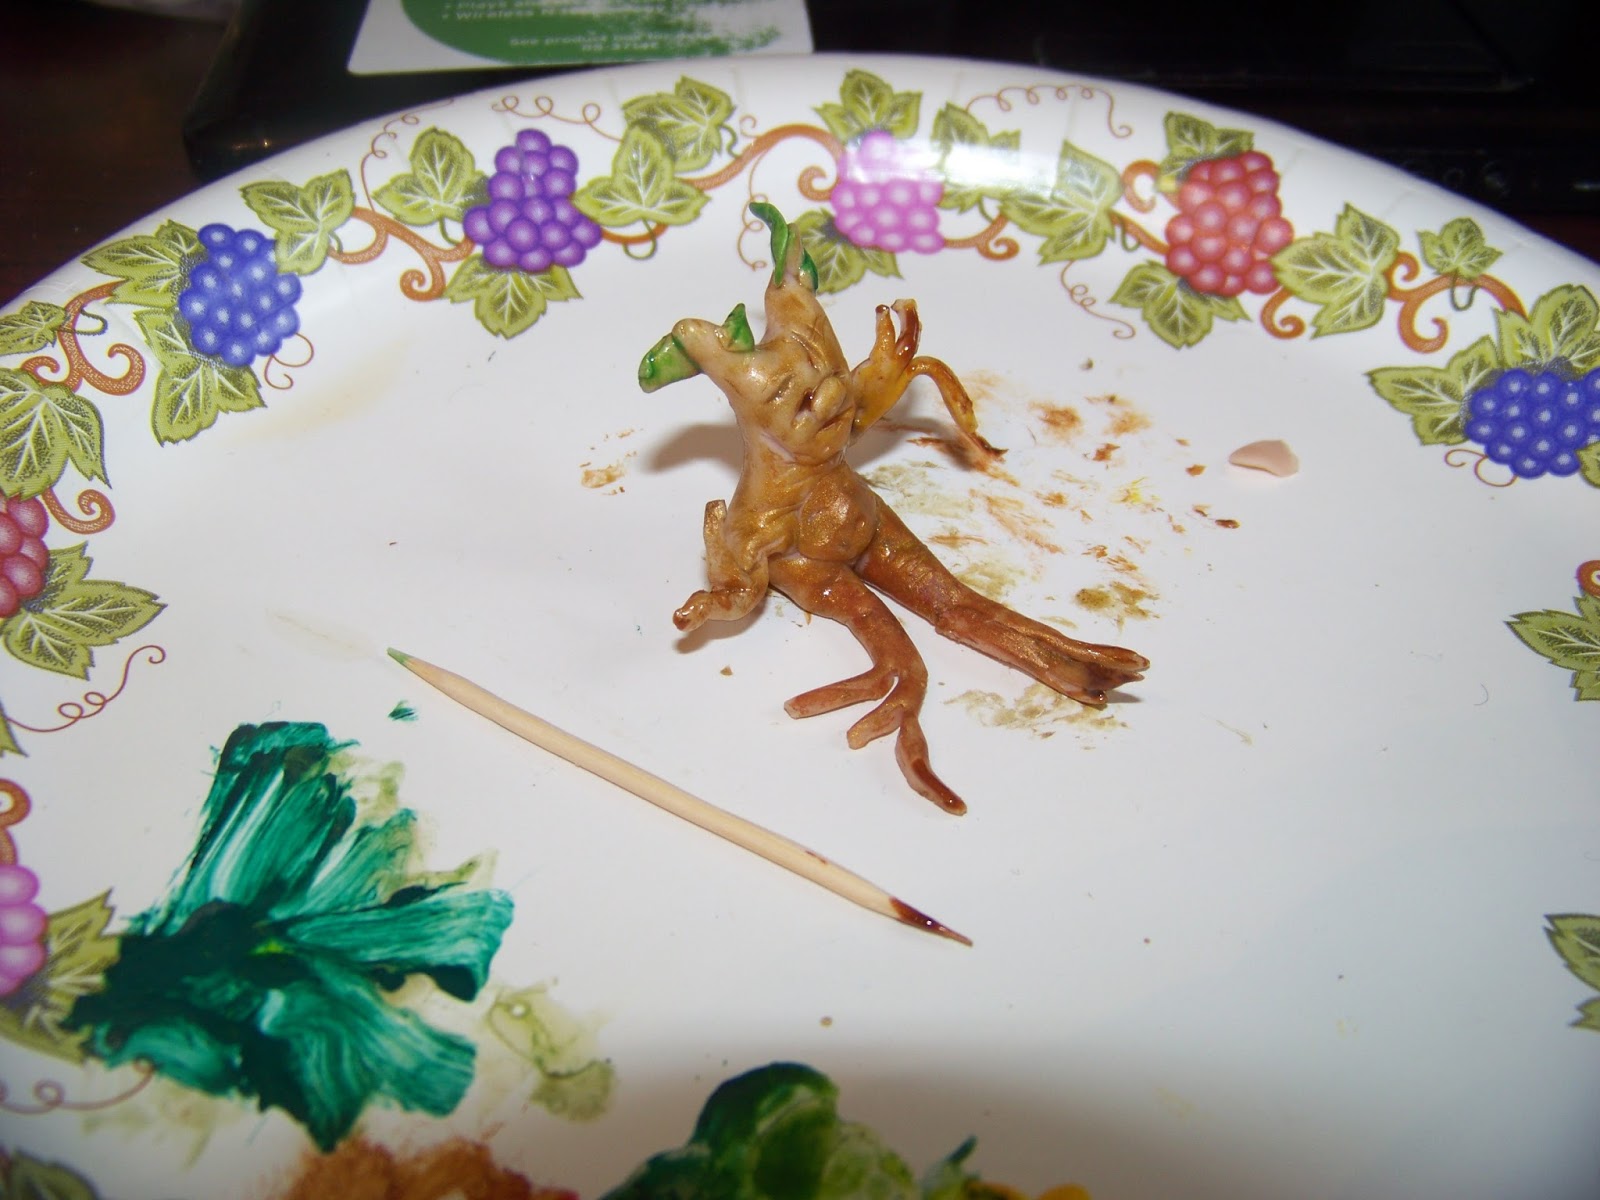
The other day I made my first baby mandrake in polymer clay. I had so much fun I followed up with a tiny polymer cat, dollhouse size.  I posted them on facebook and was asked if I could do the Grinch and his friends.  I didn't know if I could or not, so said I would try, and this is what I came up with.

Sculpting and painting the Grinch who stole Christmas
 I did the Grinch first.  He's the biggest sculpt, at  inches tall.  I used flesh colored clay and had to paint the parts.  The white paint didn't want to cover for some reason.  Painting the tiny features was a pain, but I like the way he came out; his face is so expressive.
Sculpting Max, the Grinch's dog
I decided to try to use colored clay next, to do Max, the Grinch's dog.  Here's the head and body shapes, ready for the oven (above).

Teeny tiny Cindy Lou Who in polymer
I used flesh polymer clay for Cindy Lou's face, but used colored clay for the rest of her.  She is VERY tiny...most of her height is hair, lol.

Polymer clay Grinch and Cindy Lou wWho
Here's Cindy Lou and the Grinch next to a Canadian Quarter, and a sewing ruler.

Grinch and Cindy Lou in Polymer Clay
I'm happy with Cindy Lou's little face; I gave her a snub nose and a shy grin.

Christmas decorations, Grinch style, in polymer clay
Max was the hardest to sculpt, because of all of the tiny pieces.  His ears fell off. His legs fell off.  His antlers fell off.  Sheesh!  I had to use liquid sculpey to get everything to stick together, but even then, his antlers were a problem. I eventually made the thicker antlers that you see in the photo.  Poor doggy looks like he has a tree trunk on his head, lol.

Cindy Lou and the Grinch 
Here's Cindy Lou and the Grinch by the fireplace in the pink plastic canvas dollhouse.  The dollhouse is way too big for them, but I couldn't resist.

Max the dog with fake antlers

Grinch, Max, and Cindy Lou in polymer clay

Polymer Clay Grinch and friends

Polymer clay Grinch, Max, and Cindy Lou Who

Polymer clay Christmas ornaments in plastic canvas dollhouse
I'm having a lot of fun with polymer clay, but am not thrilled about painting the eyes.  I'm happy with the Grinch and Cindy Lou but think Max needs to be repainted so his eyes are more expressive and soulful.  These eyes just don't do it for me.  I hate to retouch him though, as my paintbrushes, even the smallest ones, seem absolutely huge next to these guys. I had to use the end of a toothpick to do the pupils.


Thursday, September 12, 2013

Baby Mandrake Root in Polymer Clay for Hagrid's Hut


Baby mandrake in polymer clay
I am sooo loving this Hagrid's hut project, and I have to confess, making the tiny items to go inside the hut is a lot more fun than stitching the hut itself was, lol.

I know that Hagrid isn't Prof. Sprout, but I LOVE baby mandrakes and figured Hagrid should have one, especially since he is so into the care of magical creatures.  I am still learning how to use polymer clay (by reading books and tutorials online).  It's a lot of fun!

Learning to sculpt a tiny baby mandrake
The above pic shows my mandrake while he was baking.  One of his legs (roots) fell off and I had to glue it back on using liquid sculpy.  I re-positioned it so it wouldn't be so easy to break next time.
Painting tiny baby mandrake
I mixed green, brown, and yellow red to get different shades of brown.  I though the should be darker toward the roots and lighter in the face, with green leaves.  I didn't give him many leaves because he is just a baby and only starting to sprout :-).

Side view of baby mandrake

Little baby mandrake bottom, lol
I gave him a sort of baby bottom, but had to make him look rooty, so I drew lines down his back, and across his little behind.

Adding "soil" to baby mandrake
I dabbed a bit of white glue onto his limbs and used a toothpick to add some coffee grounds (grinds?). I even put a speck on his little cheek, lol.

Canadian Nickel and dollhouse size doll to show baby mandrake's tiny size
He's very tiny and it's hard to tell in the other photos so I put him beside a Canadian nickel and a little dollhouse doll, to show scale.

Baby Mandrake on Hagrid's table
 Here he is in Hagrid's hut, on the table. Hagrid's probably wondering where his earphones are. Believe it or not, I actually found earphones for Hagrid in a package of erasers I had purchased ages ago at the dollar store.  I'll take photos of the earphones in another post, after the baby mandrake's special Hallowe'en pot and piles of earth are done.
Baby mandrake on Hagrid's table

Making "soil" mounds and getting pumpkin ready to use as pot for baby mandrake
I mixed coffee grounds and white glue to make dirt piles.  I want to put one in the pumpkin, and one beside the pumkin, so it looks like baby Mandrake is being transplanted.  I also added some glue to the rim of the pumkin and dipped it in coffee grounds (grinds?).  Note to self; next time, let the used coffee grounds dry first, lol.

Making soil patties for baby mandrake
Needle felted Hagrid with ear muffs, repotting polymer clay baby mandrake in plastic canvas dollhouse
I found miniature earmuffs or headphones in a bag of erasers I bought at the dollar store awhile ago...perfect for this scene, lol (since the cry of a baby mandrake kill, lol).  I gave up on the coffee grains and used black wool batting for earth; it works perfectly.
Needle felted Hagrid, crocheted baby Norbert, polymer clay baby mandrake, porcelain poodle :-)
Hagrid's looking at me as if to say, "Can't you move these creatures so I can enjoy my rock cake in peace?" lol.

I'm allergic to all dogs except for poodles and have had poodles for over 20 years, so I figured my Hagrid should have a pet poodle, along with his pet baby dragon and baby mandrake, of course.

I love the baby mandrake; it was such a fun project. Now, what should I name him?

Monday, October 17, 2011

Black Bear in a Jar

Here's my little bear, coming out of his cave in the morning.  I think he wants to do some fishing ;-0.

Another view, showing jar.  


Side view.

I couldn't resist putting the moose jar behind him so it looks like there's a moose around the corner.

I put my "Bridge over Bubbled Water" jar behind, to add colour.


Other side view, with Bridge over Bubbled Water jar in background.


I had fun with this jar.  So far, this shape jar seems to hold the moisture in the best.  I had to take the lid off to air it out. 


Sunday, October 16, 2011

Sculpting a Miniature Black Bear

Well, the title says "black bear", but it's currently an off-white bear.  I made it because one of the moss jars (made yesterday) has a little cave area, perfect for a bear, I thought.

I am not a sculptor.  The last time I tried to sculpt, I made a mini baby doll that resembled an alien corpse.  I was into bread dough the year I was 21 and made several Christmas decorations, and other items, but that's it.
Polymer clay bear...my first try.
I took the above photo, and then realized it doesn't show scale, so I added a penny.
A penny to show scale...it's a tiny bear.


After I bake it, I want to paint it black.  Here he is in the oven:
Baking bear.
He looks lonely in there, and sort of polar bearish...on dirty snow, lol.
Hopefully I won't burn him.  Wish me luck.

Later that same day ;-0

Black bear, wet paint.

Here he is; yay!  I'm so glad that I didn't burn him.  I mixed blue and brown to get a nice blue-black colour, so he won't be flat black (I hope). 

I don't know how other bloggers manage to have such pretty photos of their works in progress.  I'm so messy, lol.  They have their ingredients in little woven baskets; they have pretty table cloths and everything is perfect.  I have bits of ripped paper towel sitting on the crumpled brown paper that came in my last parcel...I knew it would come in handy one day, lol.  I used a Becel lid to mix the paint.

While I wait for the paint to dry, I snapped some photos of the Bear's habitat (along with other moss jars).
Bear habitat.
I'm hoping he'll fit nicely on the "shore", with part of him in the "cave".  I had fun making this moss jar; it's my favorite one so far.